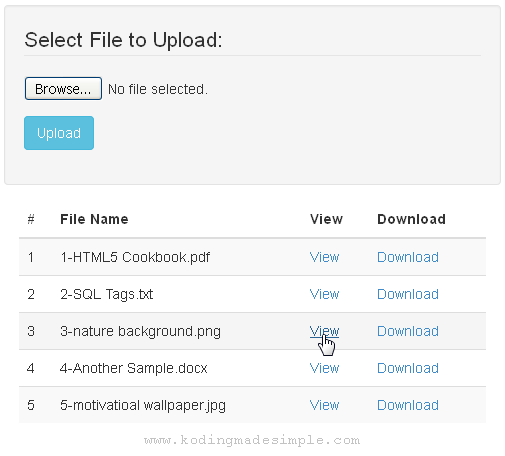
Hi! In this tutorial let me show you about upload, view and download file in php and mysql. The file uploading process is similar to what we have discussed here, but this php script not only uploads file to the server but also stores the file path and its created date in mysql database. Apart from uploading file, it also gives you the option to view file on browser and download it from server.
With PHP you can practically upload any type of files and the file uploading script I have shared below will work for all file types like PDF, Document, Images, MP3, Videos, Zip archives etc. Just include those file extensions in the filtering process ($allowed array) and you will be able to upload them.
How to Upload, View & Download File in PHP & MySQL?
Let's move on to the coding part. First you should create mysql database to store file details.
Create MySQL Database:
CREATE DATABASE `demo` ;
Use `demo`;
CREATE TABLE IF NOT EXISTS `tbl_files` (
  `id` int(9) NOT NULL AUTO_INCREMENT,
  `filename` varchar(255) NOT NULL,
  `created` datetime NOT NULL,
  PRIMARY KEY (`id`)
) ENGINE=MyISAM  DEFAULT CHARSET=latin1 AUTO_INCREMENT=1;
Next is the database connectivity script that establishes connection to mysql database from php.
dbconnect.php
<?php
//connect mysql database
$host = "localhost";
$user = "username";
$pass = "password";
$db = "demo";
$con = mysqli_connect($host, $user, $pass, $db) or die("Error " . mysqli_error($con));
?>
Then create index.php - this is the main file containing user interface. It has an upload form and a html table to display the list of uploaded files from database along with 'View' & 'Download' links for them.
index.php
<?php
include_once 'dbconnect.php';

// fetch files
$sql = "select filename from tbl_files";
$result = mysqli_query($con, $sql);
?>

<!DOCTYPE html>
<html>
<head>
    <title>Upload View & Download file in PHP and MySQL | Demo</title>
    <meta content="width=device-width, initial-scale=1.0" name="viewport" >
    <link rel="stylesheet" href="css/bootstrap.css" type="text/css" />
</head>
<body>
<br/>
<div class="container">
    <div class="row">
        <div class="col-xs-8 col-xs-offset-2 well">
        <form action="upload.php" method="post" enctype="multipart/form-data">
            <legend>Select File to Upload:</legend>
            <div class="form-group">
                <input type="file" name="file1" />
            </div>
            <div class="form-group">
                <input type="submit" name="submit" value="Upload" class="btn btn-info"/>
            </div>
            <?php if(isset($_GET['st'])) { ?>
                <div class="alert alert-danger text-center">
                <?php if ($_GET['st'] == 'success') {
                        echo "File Uploaded Successfully!";
                    }
                    else
                    {
                        echo 'Invalid File Extension!';
                    } ?>
                </div>
            <?php } ?>
        </form>
        </div>
    </div>

    <div class="row">
        <div class="col-xs-8 col-xs-offset-2">
            <table class="table table-striped table-hover">
                <thead>
                    <tr>
                        <th>#</th>
                        <th>File Name</th>
                        <th>View</th>
                        <th>Download</th>
                    </tr>
                </thead>
                <tbody>
                <?php
                $i = 1;
                while($row = mysqli_fetch_array($result)) { ?>
                <tr>
                    <td><?php echo $i++; ?></td>
                    <td><?php echo $row['filename']; ?></td>
                    <td><a href="uploads/<?php echo $row['filename']; ?>" target="_blank">View</a></td>
                    <td><a href="uploads/<?php echo $row['filename']; ?>" download>Download</td>
                </tr>
                <?php } ?>
                </tbody>
            </table>
        </div>
    </div>
</div>
</body>
</html>
Note: This demo uses twitter bootstrap for css stylesheet.
Running index.php will generate a page with upload form and table with files details similar to this. Users can either click on 'View' link to view the files on browser or on 'Download' to download the files from server.

Finally there is 'uploads.php' file which will be executed when the form is submitted to upload the selected file. Here is where we actually upload the file to the server from the client machine and save its name and uploaded date into the database.
uploads.php
<?php
//check if form is submitted
if (isset($_POST['submit']))
{
    $filename = $_FILES['file1']['name'];

    //upload file
    if($filename != '')
    {
        $ext = pathinfo($filename, PATHINFO_EXTENSION);
        $allowed = ['pdf', 'txt', 'doc', 'docx', 'png', 'jpg', 'jpeg',  'gif'];

        //check if file type is valid
        if (in_array($ext, $allowed))
        {
            // get last record id
            $sql = 'select max(id) as id from tbl_files';
            $result = mysqli_query($con, $sql);
            if (count($result) > 0)
            {
                $row = mysqli_fetch_array($result);
                $filename = ($row['id']+1) . '-' . $filename;
            }
            else
                $filename = '1' . '-' . $filename;

            //set target directory
            $path = 'uploads/';

            $created = @date('Y-m-d H:i:s');
            move_uploaded_file($_FILES['file1']['tmp_name'],($path . $filename));

            // insert file details into database
            $sql = "INSERT INTO tbl_files(filename, created) VALUES('$filename', '$created')";
            mysqli_query($con, $sql);
            header("Location: index.php?st=success");
        }
        else
        {
            header("Location: index.php?st=error");
        }
    }
    else
        header("Location: index.php");
}
?>
This script upload file from local machine to server and stores its details into database and redirects to index.php. If everything goes right you will be able to see success message on completion.

If there's any error you will be notified about it.

Also Read: PHP User Login and Signup System using MySQL
So we have seen about file upload and to view and download them using php and mysql database. If you want you can set the file size limit or restrict users to upload only pdf or images etc.
click
BalasHapusgo to this site
important site
right here